Friday, 22 July 2022

15mm Dungeon: Harry and the Yonder Stones


Meet Harry - he’s a 15mm Grey Ape originally from the superlative Crom’s Anvil ranges, now stocked by CP Models in the UK - he’s also the first 15mm sized figure that I have painted in years - so be kind!

I had originally envisaged him to be a troglodytic albino Morloch type, looming white and blind in the depths of the dungeon, but, well, he’s come out a bit fluffy-looking and more Yeti or snow beast than Haunter-in the-Dark…… oh well….. he is cute though, and currently as the sole prospective occupant of the dungeon, will be standing in to give some idea of the scale of various items as I progress - hopefully he won’t have to wait around too long for company…..

https://cpmodels.co.uk/product-category/15mm-ranges/croms-anvil/

Here he is atop the TT Combat room tiles, looking the part:


I’ve yet to finish the tiles off completely, and the edges of the set need some tidying up, but I laid out some, just as an example of how they look - below is around a third of the complete set on a round table just shy of 2 feet in diameter - so you can see that you get quite a lot of bang for your buck - I would imagine all of the tiles laid out in a dungeon set up would easily cover around a 4 foot by 4 foot space, allowing for elbow room:


My plan is to start off with various scenic and terrain items, both scratch-built and shop bought, before tackling the miniature occupants - I’m chickening out on plunging into painting figures for the moment - sort of working my way up to it…… I think the fixtures and fittings of the dungeon will be an easier entry in this, to me, a new ‘giant’ scale ! 

With this in my mind, I set about something simple and easy, namely some stone arches made from blue foam, that could serve as entry points to the underground world, or as plot points for the dungeon crawl itself.

These were formed by rough cutting the shapes, then sanding them down to roughly the right proportions, and then going to town in a ‘roughing-up’ process - chunks cut out with a sharp blade, various holes poked in to form pockmarks and wear, and some vague tracings of maybe Eons-worn carvings - the whole is then covered with a couple of layers of diluted Mod-Podge tinted with black paint - this also serves to harden up the edges as they dry, and give a bit of weight to the piece - then I went in with liberal drybrushing of greys and then some greens to act as mossy growth, with faded white outlines on the inscribed areas:


So we have a couple of large arches, and a stone portal with whirling event horizon to transport you to who-knows where, or to serve as the entry point for who-knows-what……. Well, alright, then, I freehanded a yellowy-gold spiral on the clear base of a flight stand and stuck it between the uprights - but you get the general idea ! 


Emboldened by how these turned out, I had a go at something a bit larger, with an idea to create a ‘Way Out’ to serve as the end of the adventure - the last point a party might have to pass to reach safety and the daylight……. I had envisioned a towering set of stone steps leading up to an arched exit, blasted by dragon breath, en-slimed and en-sorcelled, but ended up with a kind of giant stone armchair ! - well, at least it looks that way in the photos as Harry gets in on the act:


The Easy Recliner of Dooooooom:


The rear view with a sheer drop - oops :


Fixed it with a separate stone stairway - have to give the adventurers a chance at escape :


So, a bit of finite progress, and some fun with Harry - I’ll  leave him to disappear back through the inter-dimensional portal until the next time:


Saturday, 16 July 2022

15mm Dungeon: Dirtying it up !


One thing I have noticed about most of the scratch-built dungeon scenics out there, is how darkly painted they are - and for some reason, this just doesn’t look right to me - I know that sounds counter-intuitive (erm, it’s a dungeon, Steel - you know, deep, dark and dreary….), but bear with me - I find that working with smaller scale figures, it is always better to keep backgrounds and basing light coloured, in order to make the miniatures ‘pop’ and be more visible - so as this is going to be in 15mm, I wanted tiles that weren’t going to be monochrome black, or for example, a very dark grey.

Now if you’ve got brightly painted miniatures against say, black wall pieces, they should be more visible, right ? - but I felt that if the floor tiles were black, the walls black, any scenic pieces black, then it might just be too much, well……black ? -    :-)  I mean, we’re supposed to be having fun with this dungeon crawl, right ? - not just getting depressed ?

So, with just such torturous logic, I decided that I wasn’t going to have tiles that were lost in the blackness of Stygian gloom, but rather were damp, and dank - more verdigris than darkness, more soggy than obscured in shadow…… maybe my tiles are actually just a sub-basement, rather than an actual Dungeon - more sort of Bourgeois cellar than an honest to goodness crypt? 

Anyway, this was going to be all about dirtying things up - so after my customary blast of acrylic sanding sealer to both sides of the tile frame pieces, I went in with a medium grey base coat, followed up with drybrushings of some cheap craft paint samples called ‘granite dust’ and ‘chipped stone’:


Over this I went with a light wash of a medium green sort of splodged on, and then liberal splashing of diluted Army Painter soft tone to add to the browny-greeny-ness….. I think this gave the impression I was after, whilst retaining an overall ‘light’ background - the stone floors are visible, but not overwritten in gloom…..


This was quite fun to do in a sort of kindergarten art class sort of way, and although I had ambitions of doing a graduated soft-tone in the corners of each square, to add some depth, this soon flowed into an overall grubbiness - but given the size of the tiles, I don’t think this looks so bad - maybe for 28mm pieces you would need to be more circumspect in the application, but I was having too good a time to worry !


I kept the tiles in their frames just for ease of application, and hopefully a more consistent look across the board, although it occurs to me that a bit of re-touching at the edges might be necessary as sometimes with MDF they can separate around the sides a little when being freed from their structure - the odd bit of bare ‘wood’ can re-appear - but all I’ll need to to do is smear on some more grubbiness…..


Finally, I had a go at filling in the inscribed runic symbols with some colour to add a bit of interest - is it some code that needs unscrambling to reveal a message, or a hidden Indiana Jones-style floorplan where you must only tread on the stones with certain symbols, or be flung into the depths below…. ?

This failed to be anything other than underwhelming, however - particularly given that I had used some ostensibly ‘neon’ colours (or so it said on the side of the bottles) - ending up with some really flat, matt-looking tints - these photos are not the greatest, but believe me, they’re even worse in real life…..


I ruminated about trying to highlight the colours, but the width of the letters is so teeny-tiny, that this wasn’t really practicable whilst keeping neatly within the outlines….. oh well - maybe a re-do is necessary - it all looks a bit child’s alphabet book rather than Eldritch symbology…… !

So, a thoroughly dirty start so far, but more importantly quick and easy - no scribing lines into XPS foam, texturing with crumpled tinfoil or layers of black-tinted Mod-Podge…….well, not yet anyway !


Tuesday, 12 July 2022

New Project: 15mm Dungeon Adventure !


“You find yourself facing a low stone arch, its surface pitted and scarred - beyond, an unnatural light pierces the gloom, and you see a pile of golden treasure - gemstones, crystals, giant pearls, buried in a mound of coins…….What does your party do next…..?”

A huge departure for me, climbing up the ladder of scale, to the dizzying heights of 15mm ! - now, I haven’t painted anything bigger than 10mm in about 35 years, when I daubed Humbrol enamels in the general direction of some Ral Partha, Citadel, Asgard and Aurolea Roccoco D&D figures, back when I was a schoolboy - so this project is sort of taking me full circle…..

I’d had a hankering to do something a bit different from the usual small-scale fare in a while, and having spent a lot of time during various lockdowns perusing YouTube catching up on more recent developments in the Hobby, I had become fixated on all the amazing work out there scratch-building scenery, particularly dungeons and adventure tiles - it brought with it a whiff of nostalgia, whilst offering the possibility of a new challenge.

Although my gaming entry was really 1/300th MicroArmour, I am of a generation where D&D loomed large, and I fondly remember adventure campaigns fought with my friends, AD&D manuals at the ready, dog-eared character sheets littering the table, and odd-shaped dice scattering every which-way….. so was keen to revisit those glory days when the opportunity presented.

Now modern gaming offers an absolute cornucopia of scenics and terrain for D&D, but I wanted this project to adhere to my frugal nature, and allow for the use of basic, modular scratch-built or re-purposed items, so was going to be more about wrangling with blue foam and bits and bobs, rather than buying in lots of pre-made items - but I got a bit stuck when looking at the basic ideas of dungeon set-ups; there was plenty of inspiration out there in 3D, 2D, full wall, half wall, tiles and mats, but all seemed to mean either some expense, or a time commitment that was going to be a bit beyond me - for this reason I was delighted to come across the tile pieces produced by TT Combat here in the UK:

https://ttcombat.com/products/dungeon-tiles-set-b

Now although ostensibly 25mm ‘sized’, these seemed to be a good fit for smaller scale miniatures, so the temptations of 15mm beckoned, thanks in no small part to a selection of the Crom’s Anvil (now at CP Models) fantasy minis that I had been gifted by Mike Stockin - they seemed the best compromise in terms of creating a manageable project at relatively small expense - outside my comfort zone, yes, but containable in terms of painting and building, with large, varied and well established ranges of miniatures to draw on, whilst keeping the tabletop simple and cheap.

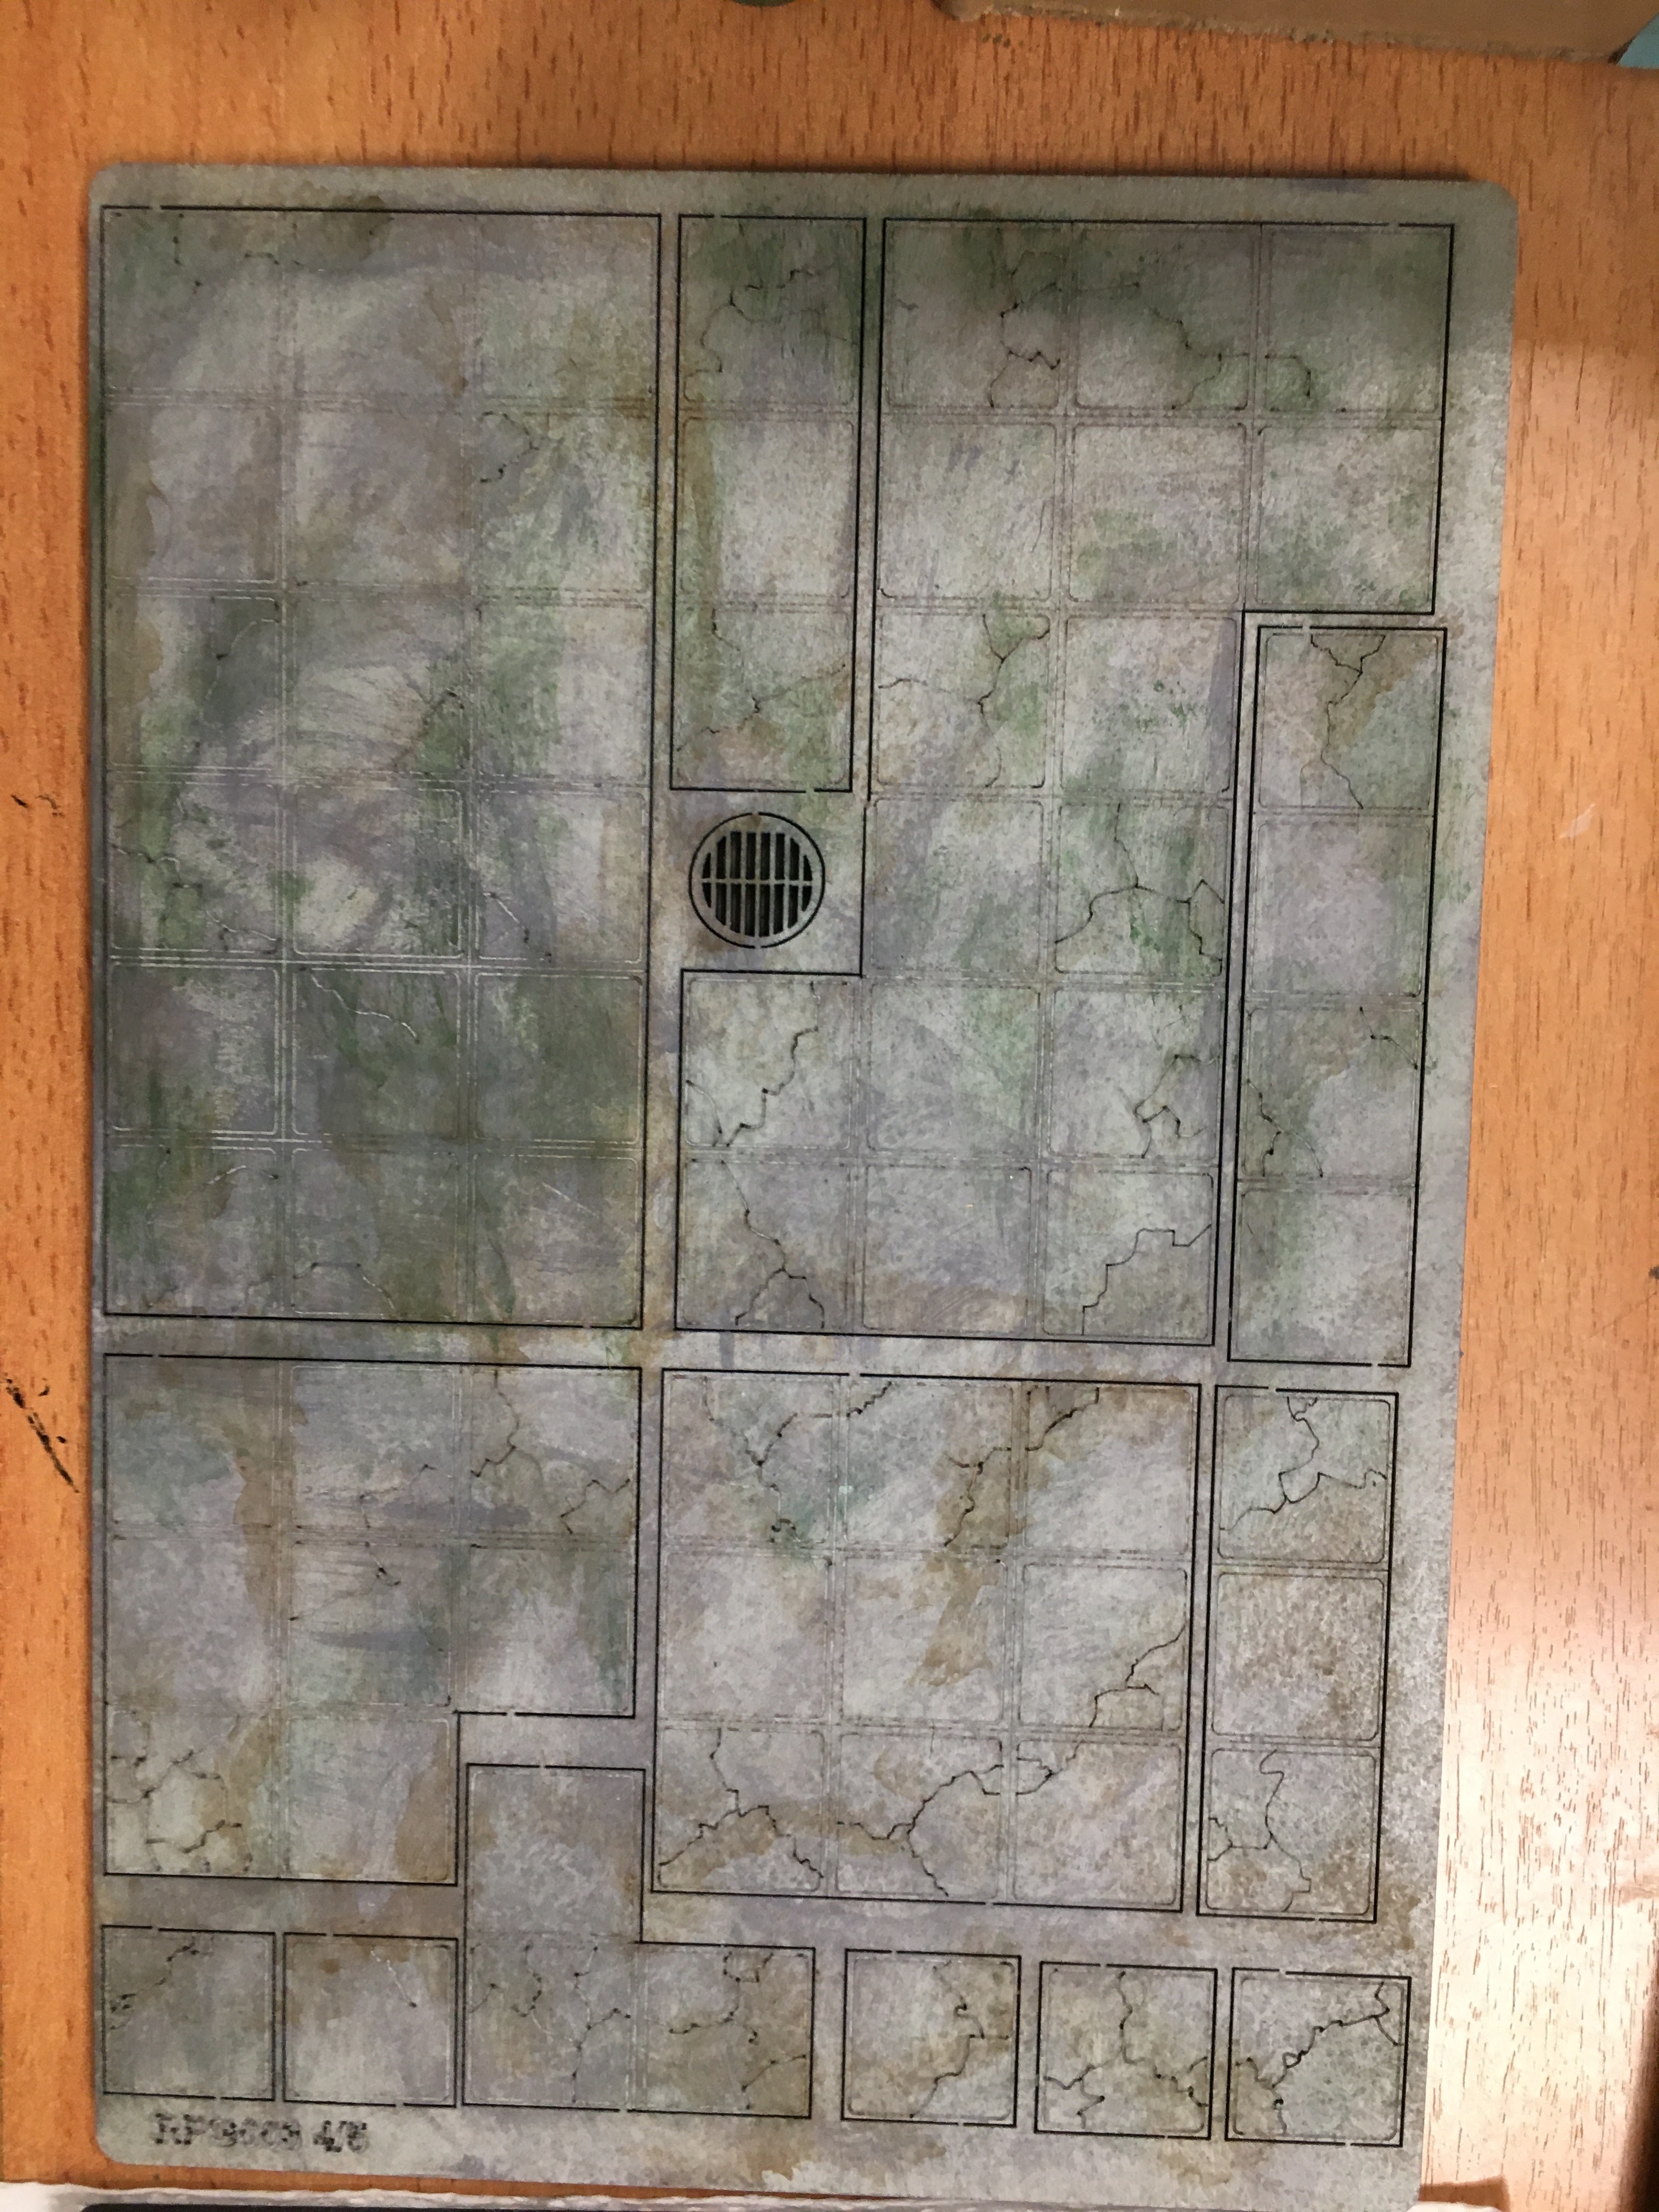
I opted for a basic set to start with to see how things went - containing 5 separate frames of variously sized tiles, they look like they will provide plenty of fun options:


Variously sized rooms, corridor strips and single tiles, even some fun looking drain grilles, along with a rune-marked main chamber - all topped off with cracked stone paving - what’s not to like ?

There’s a good YouTube video here of one of the available sets, if you want to see them in the flesh, so to speak:

https://www.youtube.com/watch?v=xWJNG9aPH4w

In line with all of TT Combat’s products, the pieces are nicely produced in MDF and clearly scribed - so just needed a basic painted undercoat with added details to begin to bring them to life. - a quick, if careful pass around the edges with a sharp knife, and they pop neatly out of the frame.

The squares on the tile measure 25mm exactly, functionally making the corridors in particular on the small side for based 28-32mm figures, particularly when considering monsters/baddies etc on larger bases, but for 15mm should be just fine:


A UK tuppence and a penny give the general idea, alongside a plastic ‘giant’ figure approx 35mm tall, who is on a very narrow integral stand:


My intention is to produce all sorts of scenic items and terrain parts that can add to this modular set-up, hopefully keeping things cheap and cheerful, as well as producing a range of adventurers and dungeon denizens for them to stumble into !

So, the overall idea is to ‘go large’ whilst keeping it small - stay tuned for more to come !

Saturday, 25 June 2022

2mm Strength and Honour: Urbs Romana


Having initially sworn off putting too much effort into the ancillary pieces for the 2mm Ancients project, I ended up going down the rabbit hole of producing a Roman fortification that could represent a ‘camp’ in Strength and Honour - to be fair to myself (!) I didn’t go the whole hog in making giant scratch-built marching forts or sections of Hadrians Wall, but rather went for a generic looking set of walls and towers, leaving an internal space that would accommodate a quartet of the 60mm by 60mm urban tiles that I made earlier.

I thought that by enabling swapping out the tiles, the walls could do double duty in posing as the fortifications of Carthage, Locus Castorum, or even the walls of Troy, depending on what I put inside.

I really liked the look of the parts from the Brigade Models’ Modular Castles range that were used by Mike Headden in his own 2mm project, detailed in the forum thread here (scroll down):

https://www.thewargameswebsite.com/forums/topic/ithoriels-strength-honour-diy/

So, digging around in the Lead Pile, I dug out some likely contenders, and, good news, also re-discovered my long-lost Roman Triumphal Arch, also from Brigade.

I had a scrap piece of laminated wood to use as a base, which measured around 160mm by 140mm, so pencilled out the ground plan of the walls and towers etc, leaving the central area big enough for the urban tiles - just about managed to squeeze them on, allowing for a bit of a moat and some ground out front.

The Brigade Models castle pieces are in resin, and come out of the pack pretty clean, so a quick blast of stone coloured paint and some red earth tone detailing over a mid brown undercoat meant the job was straightforward, although not necessarily quick - lining in around all the windows to try and stay neat had me going cross-eyed !


I did struggle somewhat in lining up the various wall sections, in that although individually well cast and straight, they are relatively short, so have a tendency to wander when modelling in a long line, and there is a bit of a gap between parts that seems obvious in these close-up photos. I think more skilled modellers or others less cack-handed could easily rectify this, or even smooth and fill any spaces, but to be honest at this scale, and tabletop viewing distances, they do the job for me !

The moat around the castle was formed merely by gluing on a strip of darker basing sand to the outer part, and splashing on some dark wash - I wasn’t going to go to the trouble of actually ‘digging’ it out ! - again, viewed from a distance, doesn’t look too bad.


The Triumphal Arch is free-floating, given that it straddles across two tiles, and enables me to use it in other settings - the terracotta coloured ‘roof’ is a bit odd, perhaps, but somehow it just looked naked when done wholly in marble white - there are a couple of bronzed panels on one side, too - no doubt detailing the Emperor’s victories - although you’d need a microscope to read them off at this scale !

I also went ahead and stole some additional buildings from Brigade Models Spanish and Arab village sets, just to add some variety to the other architecture, and make the tiles look a bit more ‘populated’


Brigade, of course, do their own Roman castle/mile fort wall set, but I followed Mike Headden’s lead in using the modular parts as they are more visually impressive, and hopefully not too anachronistic - the rounded bastion like towers on the gate sections look pretty Roman to my eye….

I’m yet to do much more with this project, as my butterfly mind has been drawing me in a completely different direction lately, and hence the time lag since my last post - I’ll no doubt keep coming back to it when the mood strikes, so stay tuned…

Next time, though - something completely different !


Saturday, 4 June 2022

2mm Strength and Honour: Town and Country


A small update on the 2mm Strength and Honour project, where I’ve been working on some crop fields for the terrain, something to sit alongside the farm complex.

I sourced some cheap 3mm MDF ‘coasters’ around 100mm by 100mm from EBay to use as terrain bases - there are quite a lot of sellers on there outside of the normal wargaming ones, that offer such blanks for craft making, which are often pretty cheap when bought in bulk - these ones are nicely done with rounded corners.

A blast of acrylic sanding spray on both sides to seal the surfaces, and a bodge of ModPodge and basing sand got me to here:


They are a bit ‘overscale’, but I put in some lines to act as ploughing/crop marks, and a few clumps of basing material to add a bit of definition as hillocks, etc.

I decided that rather than flat wheat or arable fields, however, I would follow up with using more of the pre-made sticky tufts from Serious-Play, and go for more of a olive trees/groves grape vines in rows sort of feel - that says ‘Ancients’ to me more than cornfields - I’m sure the Romans had olives for breakfast rather than Shredded Wheat !


If I’m lucky, these could also see double duty with 6mm miniatures as well, so a good result all round.

Next up, I finished painting up the remnants of the Brigade Models Roman buildings pack with the two largest examples, again based on a 60x60mm ‘tile’, forming maybe a Mansio - a sort of Ancient roadside B&B:


This can sit alongside the other town tiles, to which I also did a little bit of additional work - unfortunately the Roman walls and Triumphal Arch are still lost in the garage Lead Pile, so just a few 2mm figures cut from their bases as statuary, and some textured paper cut into sections to give a little, added, well….texture….. I didn’t yet want to go the whole hog and begin detailing the bases as such, but rather just suggest some different shapes/areas to catch the eye.


I’ve also added a few of Irregular Miniatures’ 2mm wagons as set dressing:


So, things rumble on - I’m still dithering about whether to do forests and hills fresh for this project, as I’ve got heaps of likely candidates squirrelled away somewhere already, but I’ll have to see - I’m telling myself that ‘mission creep’ on this is justified as I haven’t worked on anything else in a while…..